



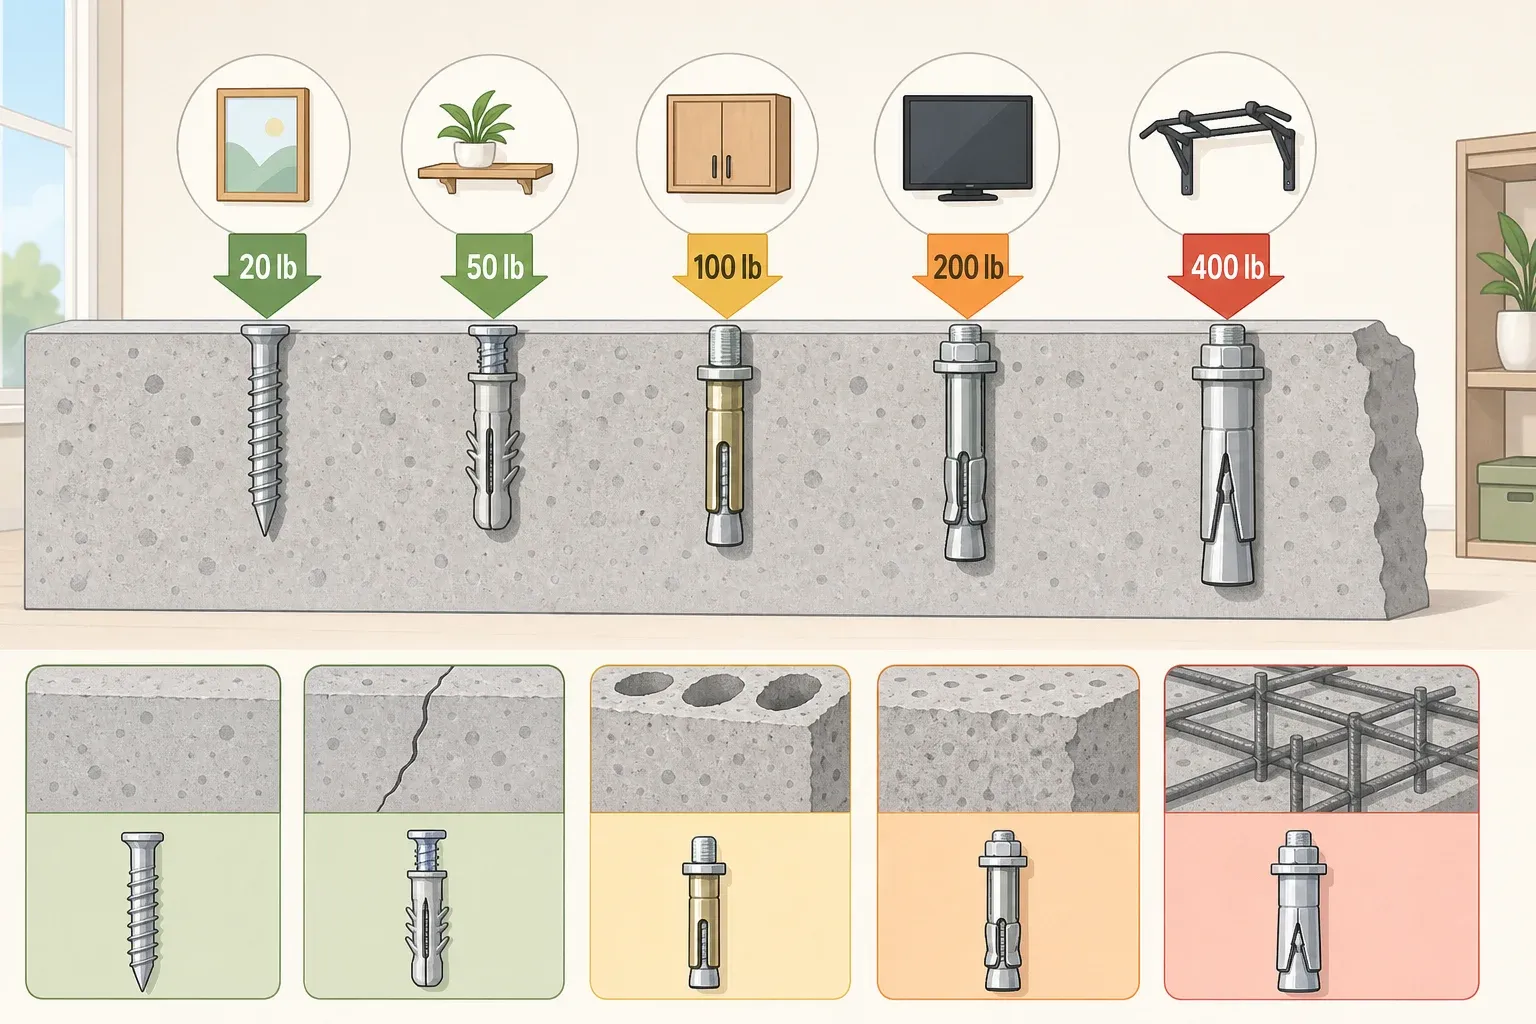
There's no single best concrete anchor for every job. The screw that holds a shelf bracket in a dry basement wall isn't the anchor that belongs under a handrail or an overhead pipe hanger. Picking the right one comes down to three questions: what kind of load it carries, whether the concrete is sound, and where it will be installed: dry indoors, damp, outdoors, or against treated wood.
Those three questions matter because anchor ratings vary sharply, sometimes within the same product line. Simpson Strong-Tie's Titen HD screw anchor is rated for both cracked and uncracked concrete across every seismic design category, while Allfasteners' XCS concrete screw is limited to uncracked concrete and only the mildest seismic zones, according to their respective ICC-ES ESR-2713 and ICC-ES ESR-5175 listings.
Epoxy anchor systems like ET-3G add another wrinkle: they're rated for cracked and uncracked concrete across all seismic categories, but they carry a required cure wait, up to 72 hours in cooler concrete, before you can load them. Size doesn't guarantee performance on its own, either. Lab testing on small screw anchors found some lose grip and slip once concrete cracks widen, even with deeper embedment.
This guide gives a quick decision tool for matching an anchor to your job, compares the real anchor families against what their evaluation reports actually cover, walks through installing each type, and marks the point where the job has outgrown a hardware-store fix.
How to choose the best concrete anchors for your job
Before comparing specific products, match your situation to one of these four categories:
Dry interior, noncritical fixture, sound concrete: a concrete screw may be the simplest choice if the product's evaluation report covers the load.
Cracked concrete or seismic demand: use only a product specifically evaluated for those conditions. Don't assume every concrete screw qualifies just because it's labeled for concrete.
Exterior, damp conditions, or treated wood: choose the exact coating and rod or anchor material the product's report permits for that exposure.
Handrails, overhead sustained tension, structural connections, rebar dowels, or unknown or damaged concrete: stop and get a design or professional installation instead of reaching for a bigger anchor.
The best concrete anchors for a given job aren't defined by anchor type alone. They're the ones whose evaluation report actually matches the load, concrete condition, spacing, edge distance, and exposure in front of you.
Load, concrete condition, and exposure: the details behind the decision
What direction is the load? Shear means weight resting against or hanging along a wall or floor. Tension means something pulling straight out, like an overhead pipe hanger pulling down on its fastener. These get rated separately, and it's easy to assume one product covers both when it doesn't. Titen HD screw anchors are rated for both tension and shear, but the Titen HD rod hanger, a different product in the same line, is described in its evaluation report for tension loads, built specifically for hanging pipes, HVAC equipment, and similar components. Check the specific product's table before assuming coverage.
Is the concrete sound, cracked, or unknown? XCS concrete screws can't be installed where cracking has already occurred or is predicted, while Titen HD and ET-3G epoxy anchors are both evaluated specifically for cracked concrete.
Dry interior, damp, exterior, or touching treated wood? Standard zinc-coated Titen HD anchors are limited to dry interior use. A mechanically galvanized version is rated for exterior exposure, damp environments, and contact with preservative-treated wood. XCS screws are dry-interior-only no matter what color coating they come in.
Three quick examples show how this plays out. A light shelf bracket may be suitable for a rated screw anchor when the product's report covers the concrete, load, spacing, and edge distance for that wall. An exterior gate hinge bolted to pressure-treated lumber needs a coating rated for exterior or damp exposure, not a standard interior-only screw. And an overhead pipe hanger, a handrail post, or any fastener going into a visibly cracked or unknown slab is a signal to slow down, covered in more detail below.
Types of concrete anchors: screws, wedge anchors, sleeve anchors, and adhesive
Concrete screw anchors, including Titen HD and XCS, drive directly into a predrilled hole with no expansion sleeve or adhesive. They're installed with a socket or impact wrench, and Titen HD anchors can be backed off up to one turn and reinstalled if a fixture needs realignment. XCS screws specifically exclude fatigue or shock loading, fire-resistance-rated construction, and any area where cracking is present or expected.
Wedge and sleeve anchors are different systems from undercut anchors, screw anchors, and adhesive anchors, each engineered to different design limits. Undercut anchors specifically rely on a mechanical interlock to transfer high static and cyclic loads into concrete, according to an ACI study that also compared design strength across undercut, screw, expansion, and adhesive anchors, and compared load-displacement behavior between undercut and adhesive anchors specifically. That work confirms these families aren't interchangeable just because they all get grouped under "mechanical anchor." No product-specific evaluation report for a wedge or sleeve anchor was reviewed for this guide, so treat any wedge or sleeve purchase the same way you'd treat a screw anchor: find that exact product's ICC-ES report or manufacturer instructions before assuming it carries a cracked-concrete, seismic, or exterior rating.
Epoxy (adhesive) anchor systems inject a two-part epoxy into the hole before a threaded rod or rebar is set. ET-3G is rated for tension and shear in cracked and uncracked concrete and can substitute for cast-in-place rebar in engineered work. That same report specifically excludes water-filled or submerged holes from its scope, a limitation of ET-3G, not a rule for every epoxy product on the market.
Titen HD, XCS, and ET-3G are all evaluated for concrete with a compressive strength between 2,500 and 8,500 psi. That's not a blanket standard for every anchor sold, it's what those three specific products were tested against. Most homeowners have no practical way to measure a slab's actual compressive strength, and that's worth acknowledging rather than guessing past. For a safety-critical connection, don't estimate the concrete's strength; treat the unknown as a reason to bring in an engineer or contractor instead.
Before you drill: know when to stop
Some jobs shouldn't be DIY projects no matter how good the anchor is. Skip the hardware-store fix and call a professional if the job involves a handrail, an overhead fixture carrying sustained tension, structural framing, rebar doweling, visibly damaged or cracked concrete, an unknown slab where failure could hurt someone, or any work that requires a permit or code inspection.
Overhead or upward-angled epoxy installs meant to carry sustained tension have to be installed by personnel certified under an applicable program, with strict temperature limits at the time of installation. Code-governed installs also require special inspection that verifies anchor type, hole cleaning, embedment depth, spacing, edge distance, and installation torque — details a homeowner hanging a shelf bracket doesn't need to replicate but a structural connection does.
A product's cracked-concrete or high-seismic rating means the anchor itself was tested under those conditions. It doesn't mean an untrained installer should self-certify a safety-critical connection just because the box says "seismic rated." Visible cracking, an unknown slab, or any load where failure could injure someone is the actual trigger for calling a professional, not the anchor's rating alone.
How to install a concrete screw anchor
Gather a hammer drill, a carbide-tipped bit sized to the anchor's specified diameter, a way to clear dust from the hole, a socket or impact wrench, and an anchor with a current evaluation report matching your load, concrete condition, and exposure. XCS installations also need a setting tool and drive socket.
Confirm the anchor's report covers your load direction, concrete condition, and exposure before buying it.
Drill the pilot hole to the specified diameter and depth. XCS anchors require the hole drilled to the embedment depth plus at least ¼ inch of clearance.
Clear the dust. This step isn't optional cleanup; it's a stated requirement in the evaluation report. Titen HD specifically requires oil-free compressed air, while XCS permits either a vacuum or compressed air, so check which applies to the product in hand.
Drive the anchor to its specified embedment. Titen HD anchors go in with a socket or impact wrench, with the head bearing flush or directly on the fixture depending on head style. XCS anchors install through the fixture using a hammer drill set to rotary-only mode with the XCS setting tool and drive socket.
If a Titen HD anchor needs realignment, back it off up to one turn and reinstall it with the socket or impact wrench.
Success looks like the anchor seated to its full specified embedment depth, with the head or nut making the contact required for that head style: flush with the fixture for countersunk heads, or bearing directly against it for hex- and flat-washer heads.
How to install an epoxy (adhesive) anchor
Horizontal or upward-angled epoxy anchors meant to resist sustained tension must be installed by personnel certified under an applicable certification program. What follows explains the limits shown in ET-3G's evaluation report. It isn't a DIY installation procedure for overhead or sustained-tension work; that job needs a certified installer regardless of how simple the mixing and injecting look.
For everything else, the exact drilling, hole-cleaning, dispensing, insertion, temperature, and cure procedure comes from that specific adhesive's manufacturer instructions, and those details vary between products. What's described here is how ET-3G is evaluated, as a reference point for understanding the limits, not a universal epoxy procedure.
ET-3G is a two-component, 100 percent solids epoxy mixed at a 1-to-1 hardener-to-resin ratio, injected into the hole before a threaded rod or rebar is set to depth. It's rated for floor, wall, and overhead orientations. Cure time depends entirely on concrete temperature at installation: 72 hours at 50°F, 24 hours between 70°F and 110°F. Don't disturb or load the anchor before that window closes.
For horizontal or upward-angled installs, the concrete, anchor, and adhesive all need to be at least 50°F and no more than 100°F for the concrete and anchor, 90°F for the adhesive, at the moment of installation. Exterior or damp exposures call for hot-dip galvanized rods meeting ASTM A153 Class C or D, or stainless steel rods, rather than standard threaded rod.
A properly set epoxy anchor has the rod or rebar seated to the full specified depth, and it's left completely undisturbed until the cure schedule for the actual concrete temperature has fully elapsed.
Finish line: checking your work
Once the anchor is set, check the basics rather than testing it under load. The fixture should sit flush with no visible gap, the anchor head or nut should be snug without having stripped the hole or crushed the fixture material, and there should be no fresh cracking or spalling in the concrete around the hole. If a screw anchor spins freely without gripping, or the concrete around the hole has crumbled, stop. Remove it, move to a fresh location per the product's spacing requirements, and don't assume a bigger anchor fixes a bad hole.
For routine dry-interior attachment jobs, buy an anchor with a current evaluation report that matches your concrete condition and exposure, follow the drill-clean-set sequence for that specific product, and don't chase extra holding power by overtightening past the listed torque spec. Anchor evaluation reports also get revised and renewed on their own schedule. Titen HD's report was revised earlier this year, and the supplied report data lists renewal in September 2026, so verify the report's current status before relying on it for a purchase.
Follow the product's current installation instructions and evaluation report; if they conflict, the evaluation report governs. And for anything overhead, structural, near a slab edge, or going into cracked or unknown concrete, that's a design question for a professional to answer, not a question of buying a bigger anchor.















Comments
Be the first, drop a comment!