



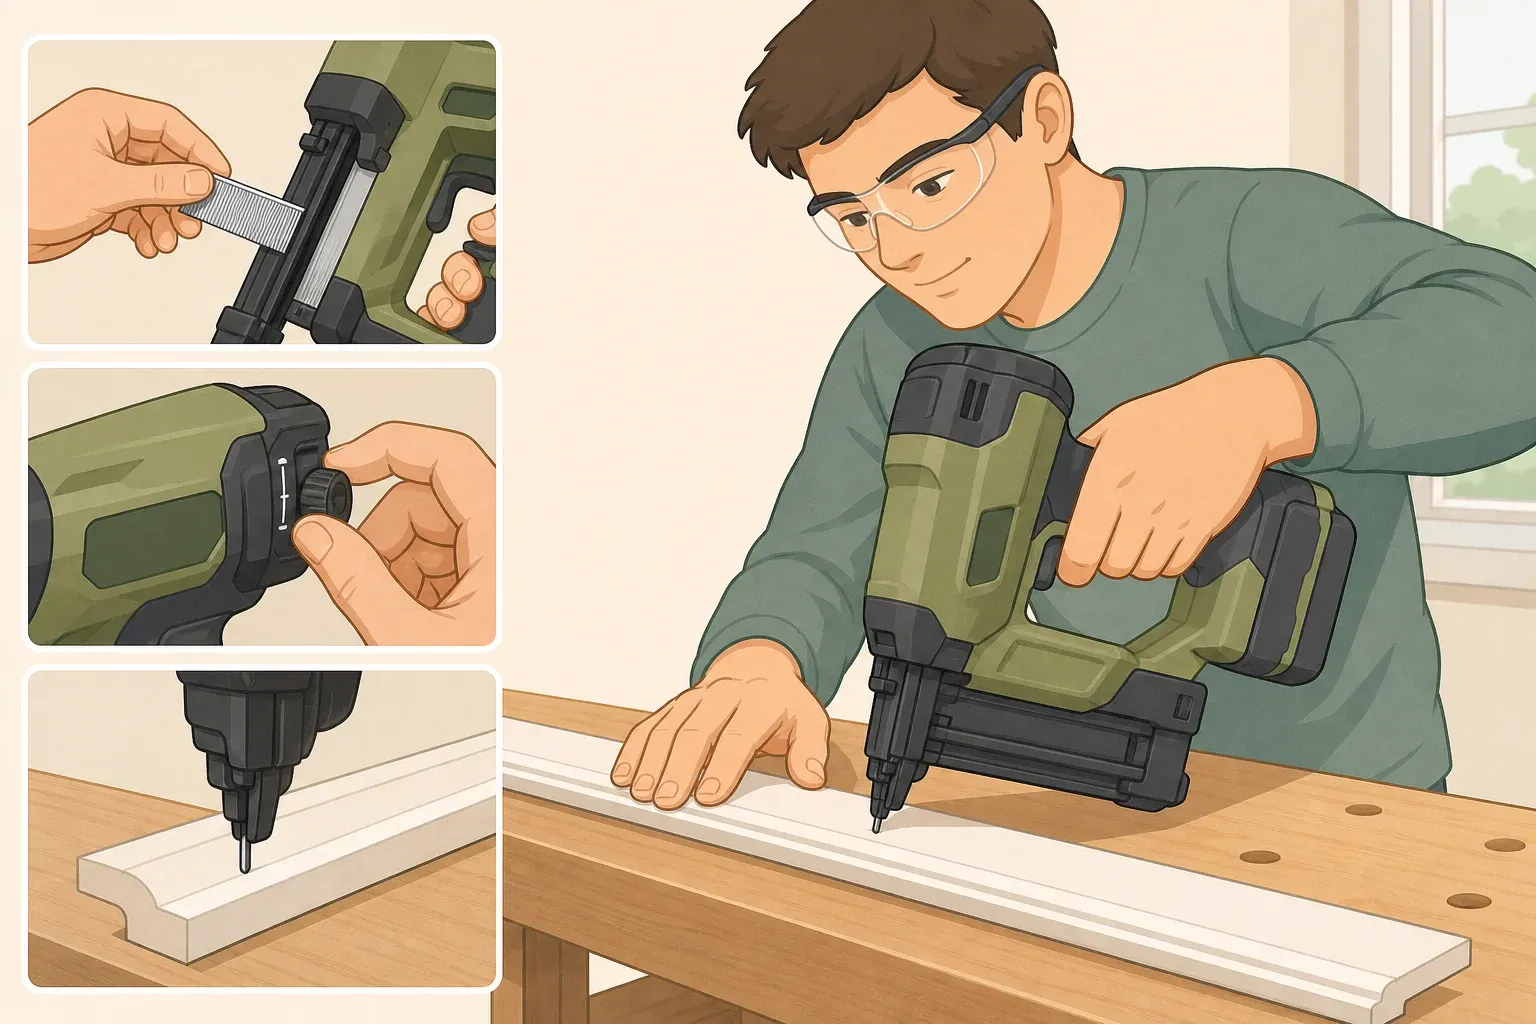
Trim projects rarely fail because a nailer jams. They fail because the wrong fastener went into the wood in the first place, and later the piece splits or works itself loose. Learning how to use an 18-gauge brad nailer starts with understanding what the tool is actually built for: thin, nearly headless nails that typically run from about 5/8 inch to 2 inches long, meant for light trim and glue-up work rather than anything that needs serious holding power.
This guide covers cordless 18-gauge brad nailers and how to run one safely from first load to finished trim piece. By the end, you'll be able to tell whether a brad nailer suits your project, pick a brad length that fits the material, and load, adjust, and fire the tool safely enough to land a clean, flush test fastener before touching the real piece. If your nailer runs on a compressor instead of a battery, the loading and depth-adjustment principles below generally carry over, but check your tool's manual first for the correct air pressure and any differences in how the magazine or trigger works.
Brad nailer vs. finish nailer: picking the right tool
Brad nailers earn their keep on quarter-round or shoe molding over painted baseboard, cabinet door stops, drawer face trim, and tacking veneer strips or edge banding into place. They also work well as a clamp during glue-ups, holding pieces steady while adhesive sets rather than doing the actual fastening.
What separates a brad nailer from a finish nailer comes down to wire gauge. An 18-gauge brad is thinner than a 16-gauge finish nail, which is thinner than a 15-gauge finish nail, and that difference in wire thickness is what separates light holding power from moderate-to-strong holding power.
Know when to switch tools. Once trim is thicker than 3/4 inch, or it's exposed to regular contact, foot traffic, or stress, brads alone won't hold it. That covers baseboards, crown molding, door casing, stair risers, and window casing. For heavier trim, use the appropriate finish nailer: 16-gauge for general trim or 15-gauge for crown molding and heavier stock. Adhesive may be part of the installation method, but its suitability depends on the materials involved and the product instructions.
Some brad nailer guides list baseboards and crown molding as standard jobs for the tool. Treat that as conditional. It holds up for thin, decorative, or already-glued pieces, not for full-thickness baseboard or crown in a room with regular foot traffic. The simplest way to sort it out: if the piece is thin, decorative trim that won't take contact or foot traffic, or it's just clamping a glue-up while adhesive cures, reach for the brad nailer. If it's baseboard, crown, casing, or another piece exposed to regular contact or stress, use a finish nailer instead.
What you'll need
A cordless 18-gauge brad nailer with a charged battery
A strip of 18-gauge brads sized for the job (1 inch to 1 1/4 inch covers most interior cabinet and trim work)
Safety glasses
Hearing protection, especially if you'll be firing a lot of rounds indoors
A scrap piece that matches the material and thickness of your actual workpiece, for test-firing
A tape measure to check trim and substrate thickness before loading
Measure the combined thickness of the trim and whatever it's fastening to before picking a brad length. The goal is a brad that anchors solidly into the substrate without punching through the back side. Your tool's manual sets the range of brad lengths it can actually fire, and the brad packaging lists what's available, so check both before you buy a box.
Charge the battery fully before starting. As one example, DeWalt's 20V MAX cordless brad nailers typically provide enough runtime for light-to-moderate jobs on a full charge, though runtime depends on the brand, battery capacity, and how much material you're driving into, so check your own tool's spec sheet if you're running something else.
Brad nailer safety tips before you start
Put on safety glasses before handling the brads or the nailer, and keep them on for the whole job. Keep your fingers, hands, and body clear of the space directly in front of the nose. That's the nail's path even when the tool looks idle.
Remove the battery any time you're loading brads or adjusting depth, not just once at the start of the job. If a brad jams in the nose, remove the battery before touching it, then follow your manual's jam-clearing procedure for your specific model rather than guessing. Jam mechanisms differ enough between brands that forcing it your own way can make things worse.
Some cordless models use a sequential trigger, meaning the nose has to press flat against the surface before the trigger will fire at all. If your tool works this way, don't try to work around that requirement to speed things up. It's a safety feature.
Before fastening near a wall, confirm you know what's behind the surface you're nailing into. If you can't confirm the nail path is clear, don't fire into that location.
How to load and operate a brad nail gun
The steps below describe the common layout on cordless models. Your manual controls the compatible brad lengths, trigger mode, depth-wheel direction, and jam-clearing steps for your specific tool, so keep it nearby the first few times through.
Confirm the battery is disconnected. Don't load brads with the battery still in the tool.
Open the magazine. Slide the magazine latch to release it.
Insert the brad strip. Load a strip of correctly gauged 18-gauge brads into the track, aligned the way the magazine expects.
Close the magazine. Push it shut until it clicks securely into place. Latch designs vary by brand, so if yours doesn't click the way described here, check the manual before assuming it's broken.
Check the fit. The magazine should sit flush with no visible gap. If it doesn't latch fully, reopen it and reseat the brad strip rather than forcing it shut.
Reconnect the battery. Only do this once the magazine is closed and your hand is clear of the nose.
Setting the depth and test-firing
Remove the battery again. Depth adjustments happen with the tool unpowered.
Turn the depth-adjustment wheel one notch. Which direction increases or decreases depth varies by nailer, so check your manual instead of guessing. This wheel matters most on delicate trim or hardwood, where an overdriven brad can blow through the surface, and an underdriven one leaves the head standing proud.
Reconnect the battery.
Line up the nose on a scrap piece that matches the real workpiece. Use the same material and roughly the same thickness as the piece you're about to install. A thinner offcut or a different species won't tell you how the actual piece will behave.
Press firmly and squarely against the surface, then pull the trigger.
Read the result before moving on:
Brad sits slightly below the surface with a clean entry hole: depth is correct. Move to the real piece.
Brad head stands proud: increase depth one notch and retest.
Wood dimples, splits, or the brad blows through the back: back the depth off one notch first. If that doesn't fix it, check whether the brad is too long for the material or you're firing too close to an edge or into end grain.
Brad bends or comes out crooked: press the nose flatter and squarer next time and try a slightly different spot.
Change one setting at a time and retest. Chasing two adjustments at once just makes it harder to tell what actually fixed the problem.
Fastening the actual piece
Once your test brads are landing flush, move to the real trim using the same technique. Press the piece tight against its mating surface before you fire, not after. If you fire first and press second, the brad has already set the gap in place. On longer runs, work in short sections, pressing and holding the trim flat a few inches at a time rather than trying to hold an entire board flush end to end.
Keep the trim from shifting between fasteners. A piece that creeps sideways or lifts off the surface between brads means the trim may no longer sit evenly against the surface, even if each individual brad looks fine going in.
Brads are holding thin, decorative material in place or clamping a glue-up, not serving as the primary fastener for anything under stress. If a piece still feels loose after a few brads, the brad nailer isn't providing enough holding power for that job. Switch to a finish nailer rather than adding more fasteners and hoping.
Troubleshooting common problems
Tool won't fire. Confirm the battery is charged and seated, the magazine is closed and latched, and, on sequential-trigger models, that the nose is pressed flat against the surface. If it still won't fire, stop and check the manual rather than forcing the trigger.
Magazine won't latch. Reopen it and reseat the brad strip in the track, then try closing it again. If it still won't latch, check the manual; magazine mechanisms differ enough between models that the fix isn't always obvious from looking at it.
Brads keep landing proud even after a couple of depth adjustments. Stop turning the depth wheel further. Check your manual for the maximum depth setting recommended for your material, and consider whether an 18-gauge brad has enough holding power for this particular piece at all.
Brads keep bending or coming out crooked. Confirm the nose is flat and square against the surface every time you fire. If it keeps happening in the same spot, try firing a little to one side; if it continues across the whole piece, the material or fastener choice may not be a good match for a brad nailer.
Nailer jams. Remove the battery immediately and don't try to clear the jam by hand. Follow your manual's jam-clearing procedure for your specific model, and don't open or modify the tool beyond what the manual describes.
Finish the job
Check the whole installation, not just your test nail. Trim should sit tight against its mating surface with no visible gap, and it shouldn't shift under normal hand pressure. If you're still seeing proud brads, splits, bent fasteners, or trim that moves after repeated test fasteners, stop adjusting and switch tools instead of continuing to fight the brad nailer.
Before calling it finished, run through this:
Inspect the entire trim run for gaps or movement, not just the spots you remember fastening.
Fill only the holes where the brad sits flush or just slightly recessed.
If a brad is still standing above the surface, deal with it first. Increase the depth setting and refire nearby, or correct that fastener before you fill or sand anything around it.
Remove the battery once you're done firing.
Clean dust from the magazine and driver tip and store the nailer somewhere dry, following your manual for any lubrication steps since those vary by brand.
Small brad holes on visible surfaces are quick to fix once everything is sitting flush: a dab of wood filler and a light pass of sandpaper takes care of them in a few minutes. That quick fix is part of why the tool works so well for detail trim in the first place.

















Comments
Be the first, drop a comment!