





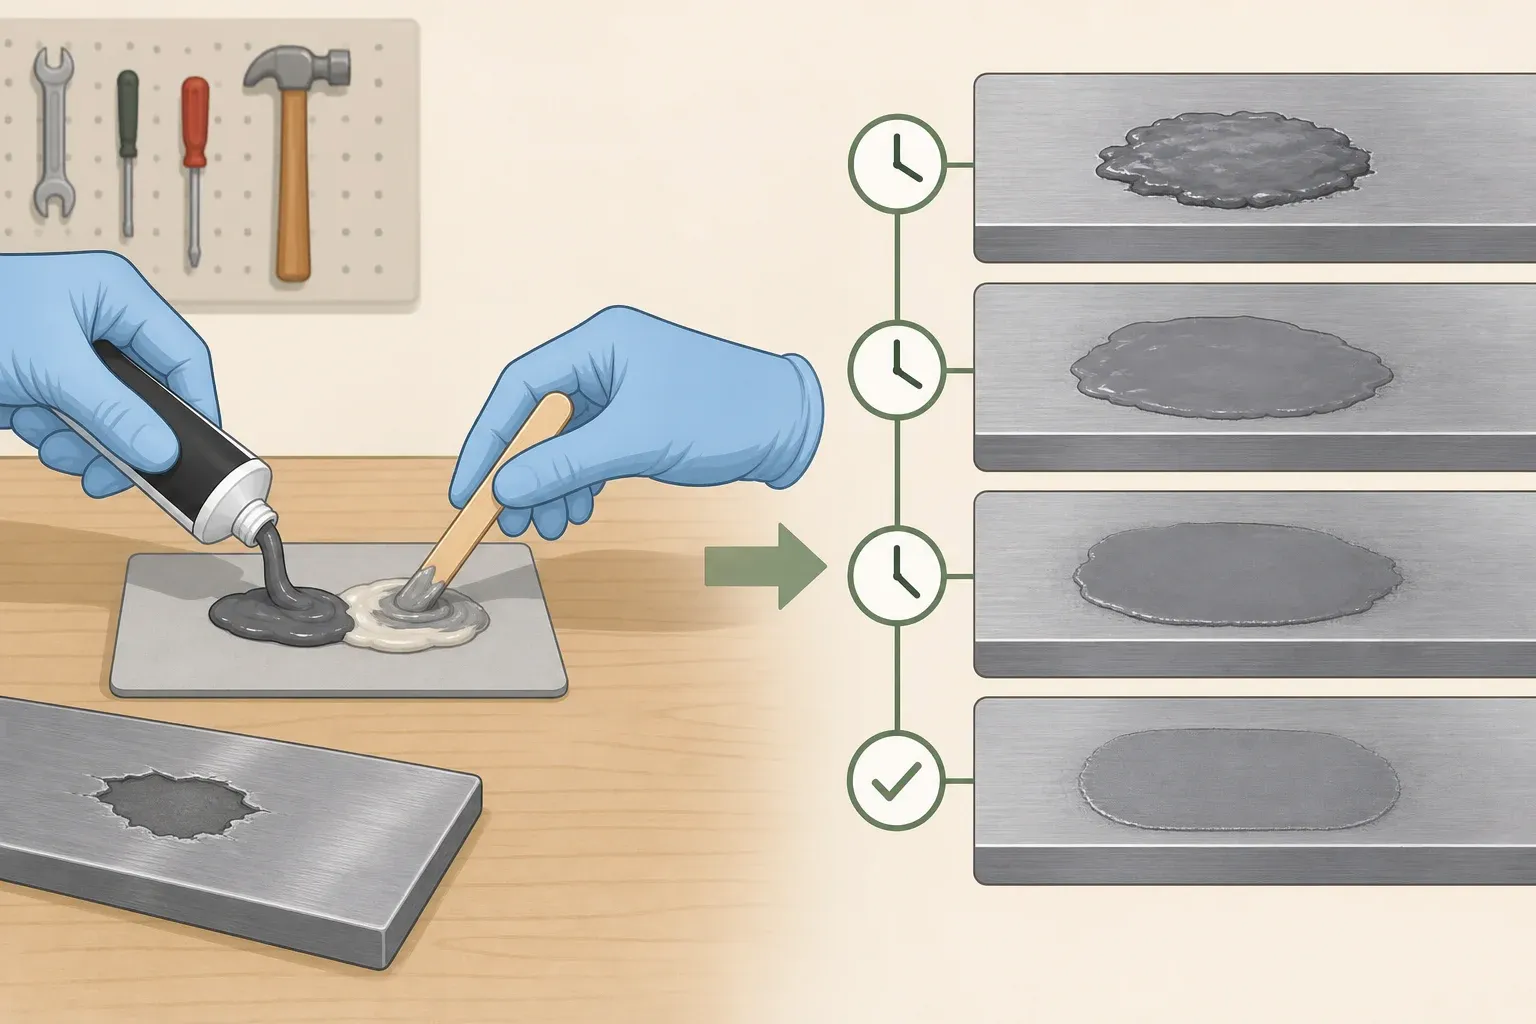
Original J-B Weld feels hard enough to leave alone after 4 to 6 hours at room temperature, but it needs roughly 15 to 24 hours before the repair is actually finished curing. A repair that feels solid enough to bump into after a few hours is only set, not cured. That gap matters before drilling, sanding, painting, or putting any weight on it.
People also search for how long J-B Weld takes to dry, but epoxy doesn't dry the way paint does. It hardens through a chemical reaction between resin and hardener, and that reaction is what "curing" means throughout this guide.
Temperature changes those numbers more than almost anything else in the process. At 50°F, full cure stretches to roughly 24 to 36 hours, and the reaction slows further the colder it gets. This guide covers the classic two-part J-B Weld epoxy: what to check before mixing, the set time and full-cure timeline, a temperature-adjusted schedule for cold garages, and what to do if a repair stays tacky longer than expected.
Cure time isn't the deciding factor for anything structural, pressurized, or safety-critical. Whether a specific product is approved for that kind of job lives on the label, not on a stopwatch. Different J-B Weld formulas carry different approved uses, so check the packaging for the exact product in hand before assuming this guide's timeline or scope applies.
Before you start: product scope, safety, and what you'll need
The numbers in this guide are for Original J-B Weld specifically. If the tube in hand is KwikWeld, SteelStik, WaterWeld, or another formula, its mix ratio, working time, and temperature limits can differ, so follow that product's own label instead of the estimates below.
One rule before opening any tubes: never apply an open flame, torch, or concentrated high heat to the tubes or a curing repair. Cured epoxy can burn, and heating it can release harmful fumes. The warming method described later in this guide uses warm water only, never direct heat.
Gather these before mixing anything:
The exact J-B Weld product for the job (Original, KwikWeld, SteelStik, WaterWeld, or another formula)
A disposable mixing surface, like a scrap of cardboard, a plastic lid, or a sheet of foil
A stir stick or another disposable tool for combining resin and hardener
Cleaning material suited to the surface, such as a degreaser, rubbing alcohol, or sandpaper for rough prep
Gloves
A clamp, tape, or another way to hold the parts still while the epoxy sets
A thermometer if working in a cold garage or basement
Prep and mixing: what determines whether cure time even applies
A slow-looking repair can also result from problems that start before curing ever begins. A few checks up front head off most of them.
The temperature that matters isn't just the room air. Both the epoxy tubes and the parts being bonded need to sit within the workable range, since a cold metal part can slow curing locally even when the rest of the space feels comfortable, based on general two-part epoxy behavior. If a bracket has been sitting on a cold concrete floor, warm the bracket itself, not just the room around it.
Surfaces need to be clean and dry before mixing. Contamination from moisture, oil, or dust at the bond line is a known cause of a repair peeling or failing to bond properly. That's a bonding problem, separate from whether the epoxy itself finishes curing on schedule. Wipe the area down, let it dry fully, and avoid touching the bonding surface with bare fingers right before applying epoxy.
Check the label for the exact mix ratio and dispense carefully. Guessing at the amounts is a good way to end up with a repair that stays soft no matter how long it sits. Mix thoroughly once dispensed. General epoxy guidance recommends at least 90 seconds of mixing rather than stopping the moment the color looks uniform. An inaccurate or incomplete mix, even one that looks close enough, can leave a bond that never fully hardens.
Application sequence, step by step
Bring the tubes and the parts above 50°F. That's the recommended minimum working temperature for J-B Weld.
Clean and dry the bonding surfaces, and let them air dry completely before mixing anything.
Dispense resin and hardener onto the disposable mixing surface using the ratio listed on the label.
Mix for at least 90 seconds, working the two parts together until the color and texture are uniform all the way through.
Check the label for the working time and apply before the mix starts to stiffen on the mixing surface.
Clamp, tape, or otherwise hold the parts still. Use enough pressure to keep the joint from shifting, but not so much that it squeezes epoxy out of the bond line, and check that nothing has moved before walking away.
Keep the temperature steady through the entire cure window, not just at the moment of application. A warm mixing area followed by a cold overnight garage still slows things down.
How long does J-B Weld take to cure before use?
Three milestones matter here, and they're not interchangeable. Set means the epoxy is hard enough to leave undisturbed without smudging it. Full cure means the chemical reaction has finished and the bond has reached its intended strength. Safe return to service means the specific product is approved, by its own label, for the job the repair is doing, not just that enough hours have passed.
At around 70°F, original J-B Weld sets in 4 to 6 hours and reaches full cure in 15 to 24 hours. Before sanding, drilling, machining, or painting, wait out that full 15 to 24 hour window. Working the repair earlier can distort or weaken it before the epoxy finishes hardening.
A quick reference for room-temperature conditions:
Touch or leave undisturbed: 4-6 hours
Machine, drill, sand, or paint: 15-24 hours
Return to light, non-critical use: 24 hours minimum, as a conservative rule of thumb once full cure is reached
Full cure tells you the epoxy has finished hardening. It doesn't by itself clear a repair for a specific job, since product approval is a separate question from timing. Once the full-cure window has passed, check that exact product's label for its listed uses before deciding whether the repair belongs back in service.
J-B Weld curing time in cold weather
That 24-hour full-cure window assumes a warm shop. An unheated garage runs on a different clock, and the gap is bigger than most people expect.
TemperatureSet timeFull cureExpected result70°F4-6 hours15-24 hoursFull strength50°F8-12 hours24-36 hoursHigh strength40°F12-24 hours48-72 hoursMedium strength32°F24-48 hours3-5 daysLow strengthBelow 32°FMay not setMay not curePoor or fails
These figures come from Metal Fusion Pro and should be read as estimates, not measured strength ratings or a guarantee. At 32°F, the same source notes curing may simply take days or may not finish at all, so treat the 3 to 5 day figure as a rough outer bound rather than a fixed number.
Cure speed depends on the actual temperature of the parts and the epoxy, not just what the thermostat reads, plus how steady that temperature holds through the entire window and how thick the applied layer is. The workable sweet spot for the classic formula sits around 70°F to 80°F, while 50°F is the manufacturer's recommended minimum. Below 60°F, the reaction slows enough that cure time can double or triple.
For Original J-B Weld in a cold garage, the cited guidance suggests warming the resin and hardener tubes in warm, not hot, water for 10 to 15 minutes before mixing, then keeping both the tubes and the parts above 50°F for the entire cure. Follow the label instead if working with a different formula. The no-flame, no-direct-heat rule covered earlier applies here too.
Still tacky after the expected time? Troubleshooting steps
If a repair hasn't hardened on schedule, work through this in order instead of waiting longer and hoping.
Check temperature first. If the space has been below 60°F, a slow cure is expected, not a failure. Move the piece somewhere warmer and give it more time rather than assuming something went wrong.
Check the mix next. Uneven ratios or insufficient mixing are common causes of a surface that never fully hardens, since the reaction depends on both parts combining evenly throughout.
If the cured layer peels off easily even after the expected window has passed, the mix likely failed chemically. Scrape it off and remix a fresh batch rather than waiting longer. No amount of extra time fixes a batch that didn't combine the first time correctly.
If the tubes were previously frozen, thaw them at room temperature only, never in a microwave or with direct heat, and discard the product if the resin or hardener looks grainy or separated once thawed.
If the repair still feels soft or tacky after the full-cure window has passed under warm, stable conditions, stop waiting and inspect the mix and surfaces instead. At that point, remove the repair, clean both surfaces, and remix a new batch.
Finish line: what to check before calling it done
Weigh elapsed time against the actual temperature the piece experienced, not the room's average reading. A cold part sitting near a drafty wall or an unheated floor can quietly add hours or days to the numbers above.
Inspect the surface directly before trusting it. It should feel hard and rigid, with no soft spots, give, or stickiness at the edges or underside where it's harder to see. Treat this as a cautious check, not proof of full bond strength.
If the surface passes that check at the appropriate time for its temperature, it's ready for the next step: machining, painting, or light use, based on the cure-time guidance above. If it's cold and still firming up, warm the area and give it more time. If it's still soft after the full window at a warm, stable temperature, redo it rather than guessing again.
For anything structural, pressurized, or safety-critical, the label for that exact product is still the final word, not the clock. When in doubt, choose a mechanical fix or a professional repair instead.











Comments
Be the first, drop a comment!