



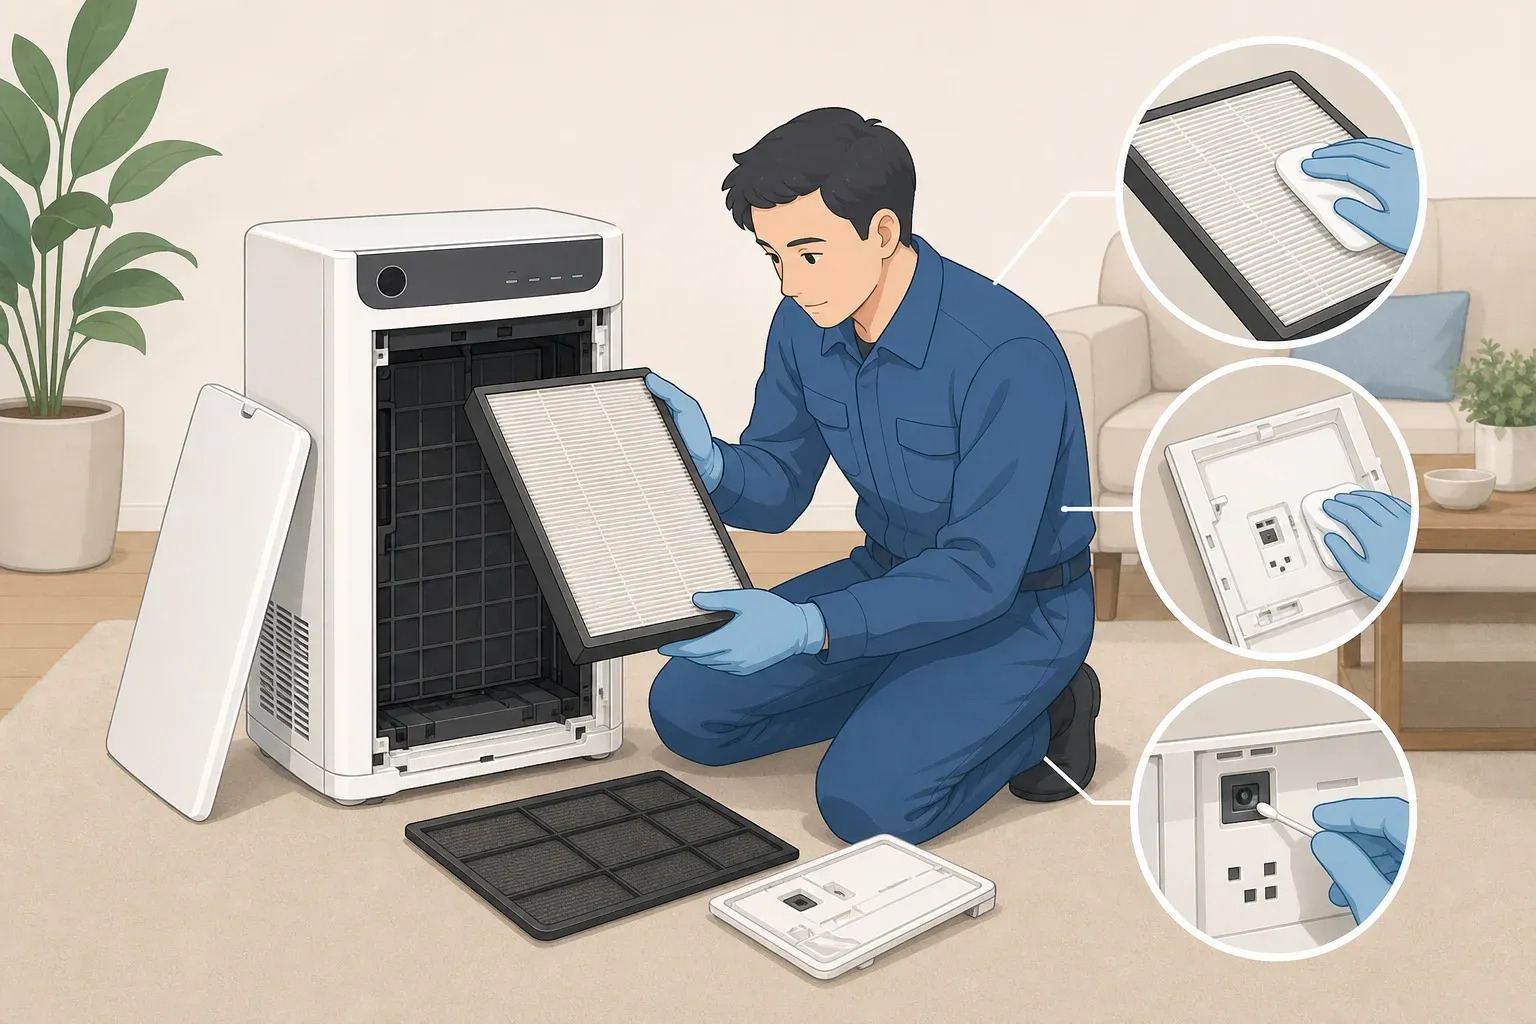
A Daikin air purifier that seems dead or useless often comes down to something ordinary: a loose panel, a dirty filter, bad placement, or a sensor that needs wiping down. Several common symptoms have simple owner checks, including panel seating, filter condition, placement, and sensor cleanliness. Daikin's own troubleshooting guide sorts these complaints into a handful of categories, including units that won't operate, won't discharge air, won't purify, and won't humidify, plus a separate bucket for abnormal sound, odor, or lights. This guide walks through each category so you know what to check, what counts as normal, and when a symptom means stop and call for service instead of digging further.
Before you start: panel design, sensors, filter names, and cleaning steps vary by model. The checks below draw on Daikin's general troubleshooting categories along with two specific model manuals, the MCK70ZVM-H humidifying purifier and the MC707PVM air cleaner. Your unit might not have a PM2.5 display, a streamer discharge component, or a /humidifying mode at all, so confirm what your specific model actually has before assuming a step applies.
What you'll need
Your exact model number and, if possible, that model's manual (search the model number plus "manual" if you don't have a paper copy)
Access to the wall outlet the unit is plugged into
A vacuum with a brush attachment or a soft, dry cloth
A sink or basin, only if your model's manual lists specific parts as washable
Nothing here requires tools beyond that. The checks below do not require opening the housing or touching wiring. If a fix seems to require more than removing a front panel or filter tray, that's your cue to stop and contact service.
Quick symptom routing
Match your symptom to the right section before troubleshooting, since jumping straight to the wrong fix wastes time:
No lamp or no response to the power button: check the panel and pre-filter seating below.
Unit runs but moves little or no air: check obstruction and the pre-filter.
PM2.5 reading stays low or doesn't move: confirm your model has a PM2.5 sensor, then follow the sensor-cleaning steps.
Room still feels stuffy despite the unit running: check coverage and placement.
Humidity isn't rising: confirm the unit is a humidifying model, then check for a drying cycle.
Water, smoke, unexplained heat, or lamp behavior your manual doesn't cover: skip straight to the last section and stop troubleshooting.
Daikin air purifier troubleshooting when the unit won't turn on
Daikin lists a unit that doesn't respond to the ON/OFF button as one of its troubleshooting categories, and it's usually the first thing an owner searches for when a Daikin air purifier isn't working at all.
Start with the front panel. If the indicator lamp stays completely dark, Daikin notes that the panel may have come loose from its proper position and just needs reseating. On the back of that panel is a small protrusion that functions as part of a safety switch. If it's cracked or broken off, that may prevent the unit from operating, and Daikin recommends inspecting the piece directly.
For the MC707PVM specifically, the manual is direct about the pre-filter: the unit needs to run with it properly seated, and operating it without that filter in place may cause a malfunction. That's worth checking even if the symptom you're seeing is "won't power on" rather than a purification complaint, since it's one of the few conditions the manual flags as capable of triggering malfunction.
For a cautious inspection, unplug the unit before removing any panel or filter, and follow your model's manual for the exact release mechanism:
Unplug the unit.
Remove the front panel and reseat it fully according to your model's manual. (The MCK70ZVM-H, for example, has two lock levers on the left and right sides that need to catch.)
Inspect the back of the panel for the small safety-switch protrusion. Look for cracks, breaks, or a piece that's snapped off.
Confirm the pre-filter is fully installed, not just resting on top of the frame.
Plug the unit back in and press the power button.
If the panel was the issue, the indicator lamp should light up, and the unit should respond normally once it's properly seated. If the panel is seated, the protrusion is intact, and the pre-filter is installed correctly, but the unit still won't power on, that points to something beyond ordinary troubleshooting. Stop there and contact Daikin service rather than opening the housing further.
Daikin air purifier not blowing air: fixing weak or no airflow
Daikin treats "does not discharge air" as its own category, separate from purification problems, meaning a unit can technically be running while barely moving air (troubleshooting page). If your Daikin air purifier is not blowing air the way it used to, placement and the pre-filter are the two things to check before assuming a defect.
For the MCK70ZVM-H, the manual asks owners to check whether the unit is tucked somewhere the airflow can't reach, or blocked by nearby obstacles, and to relocate it somewhere air can circulate through the whole room. It sounds obvious, but a purifier pushed into a corner behind a couch or a cabinet can look broken when it's really just boxed in.
The pre-filter is the other check worth making. For the MC707PVM, it's the first stage air passes through before reaching internal filtration, and the manual recommends cleaning it every two weeks. A dirty pre-filter is one of the checks to make if airflow feels weak, even though the research doesn't state exactly how much a clogged one restricts output.
Before soaking anything, check your model's cleaning table. For the MC707PVM manual, three components are listed as safe to soak in water: the opposing pole plate, the streamer discharger, and the ionizing frame. The same manual separately and clearly warns never to wash the main unit housing with water, since water getting inside can cause electric shock or malfunction.
Here's the sequence:
Unplug the unit before removing any panel or filter.
Check your model's manual for obstruction and placement guidance, and relocate the unit if it's boxed in.
Remove the pre-filter and inspect it for dust buildup.
Clean it according to your model's cleaning table. Soak only the parts your manual lists as washable; vacuum or wipe everything else with a dry cloth.
Let every soaked part dry fully before reinstalling anything. Operating the unit with damp components, or reinstalling them wet, risks the same shock and malfunction issue as washing the main housing directly.
Reinstall components in the correct order and plug the unit back in.
Retest on the same fan speed you were using before.
If the pre-filter or placement was the problem, airflow should improve once the unit is relocated and the filter is clean and dry. Don't soak or rinse the main housing or any part your manual doesn't list as washable.
One maintenance note worth filing here: filter life varies by component. On the MC707PVM, the bio-antibody filter is rated for roughly one year after opening, separate from the two-week pre-filter cleaning cycle. Follow your own unit's replacement indicator rather than assuming one schedule covers every filter in the machine.
When the air still seems dirty, or the reading looks stuck
Daikin separates "does not purify air" from airflow problems entirely, and that category covers two different complaints: a display that won't move, and a room that still feels polluted despite the unit running.
A stuck or unresponsive PM2.5 reading. For the MCK70ZVM-H, the manual describes this exact symptom: a PM2.5 concentration display that stays low and doesn't seem to respond. Daikin says sensitivity may become poor when the lens is dirty, and recommends cleaning the PM2.5 sensor lens regularly. Locate the sensor lens using your own model's manual, since its position varies, and wipe it with a dry, soft cloth rather than guessing at a method. After cleaning, let the unit run normally and watch whether the reading starts to shift with real room conditions instead of sitting frozen on one number.
A room that still feels polluted. This falls under the same "does not purify air" category but doesn't necessarily mean the unit is broken. Coverage and placement are two possibilities to check before treating the unit as defective. The obstruction checks from the airflow section apply here too: a unit blocked by furniture or angled away from the room will underperform no matter how clean the filter is. Room size matters as well. The MC707PVM's applicable room area is listed at 48 square meters, and running it in a larger space than that will limit noticeable results even when the unit is functioning as designed.
Before assuming a defect, confirm placement and pre-filter condition, check that your room isn't larger than your model's rated coverage, and try bumping up the fan speed. A purifier quietly running on low in a room bigger than its rating is one likely explanation, not an automatic diagnosis of failure.
Fixing a humidifying model that won't raise room humidity
This section only applies to combination humidifying-purifier models like the MCK70ZVM-H. Standard air cleaners such as the MC707PVM have no humidifying function at all, so skip this if your unit is a plain air cleaner.
For the MCK70ZVM-H, the manual addresses this directly under a scenario it labels "ambient humidity does not rise." It explains that low indoor or outdoor humidity, dry walls and floors, or a room with poor draft insulation may keep the target humidity out of reach even when the unit is operating normally. A big, drafty room asking for a high humidity target is fighting the room itself as much as the machine.
There's also a timing quirk. If the unit ran a combined humidifying-and-purifying cycle within the past hour, it may automatically shift into a humidifying-filter drying operation, which can look like the humidifier has simply stopped working.
If humidification seems stalled, check whether that combined cycle ran in the last hour before troubleshooting further; the drying operation may explain it on its own. If that's not the case, look at the room: close doors, deal with obvious drafts, and scale back expectations in a large, poorly insulated, or already dry space. A humidifying model that can't hit a high setting in a drafty room isn't automatically a defective one.
Daikin air purifier error light, odor, sound, and leakage: what's normal and what's not
Daikin's troubleshooting page names abnormal sound, abnormal odor, water leakage, and erroneous lamp indication as separate categories from the performance issues above, and this is where "keep checking" and "stop and call" split sharply.
Sound is the easiest one to misread. For the MC707PVM manual, a "fizzing" sound from the streamer discharge component is expected during normal operation, not a fault. As a cautious general rule beyond what any manual states, a soft fizz near that area is fine; grinding, rattling, or a high-pitched whine is worth checking your model's manual for, and worth a call to service if it persists or you can't find an explanation.
Odor deserves the same treatment: check your specific manual first rather than assuming a smell means something is wrong. Any burning smell or visible smoke is different and is a safety concern regardless of model, as a matter of ordinary caution; unplug the unit and don't keep running it while you investigate.
Indicator lights usually mean routine maintenance, not failure. For the MC707PVM manual, the signals are simple: a cleaning sign blinks when a component needs attention, and a replacement sign turns on or blinks when a filter is due. If a Daikin air purifier error light matches something explained in your manual, clean or replace the indicated part and move on. Any light behavior your manual doesn't explain, especially alongside odor or heat, is worth a call to service rather than a guess.
Leakage is the clearest stop point of all. The MC707PVM manual is explicit that water getting inside the main unit, including from washing it directly, can cause electric shock or malfunction. If you see water pooling near the base, don't open the housing to look for the source. Unplug the unit and contact service.
Finishing up
Once you've worked through the relevant check above, run through this before you call it done:
Reinstall only parts that are completely dry, in the order your manual describes.
Retest on the same fan setting you were using before, and confirm the lamp, airflow, PM2.5 reading, or humidity output behaves the way your manual describes as normal.
If the problem persists, write down your exact model number, the symptom, and any indicator light behavior before contacting service.
Stop and call service, rather than troubleshooting further, for persistent power failure after checking the panel and pre-filter, any water leakage, burning smells or smoke, or lamp behavior your manual doesn't cover.
None of those four situations are ordinary-reader fixes, and pushing further on your own risks turning a manageable issue into a bigger one.

















Comments
Be the first, drop a comment!