



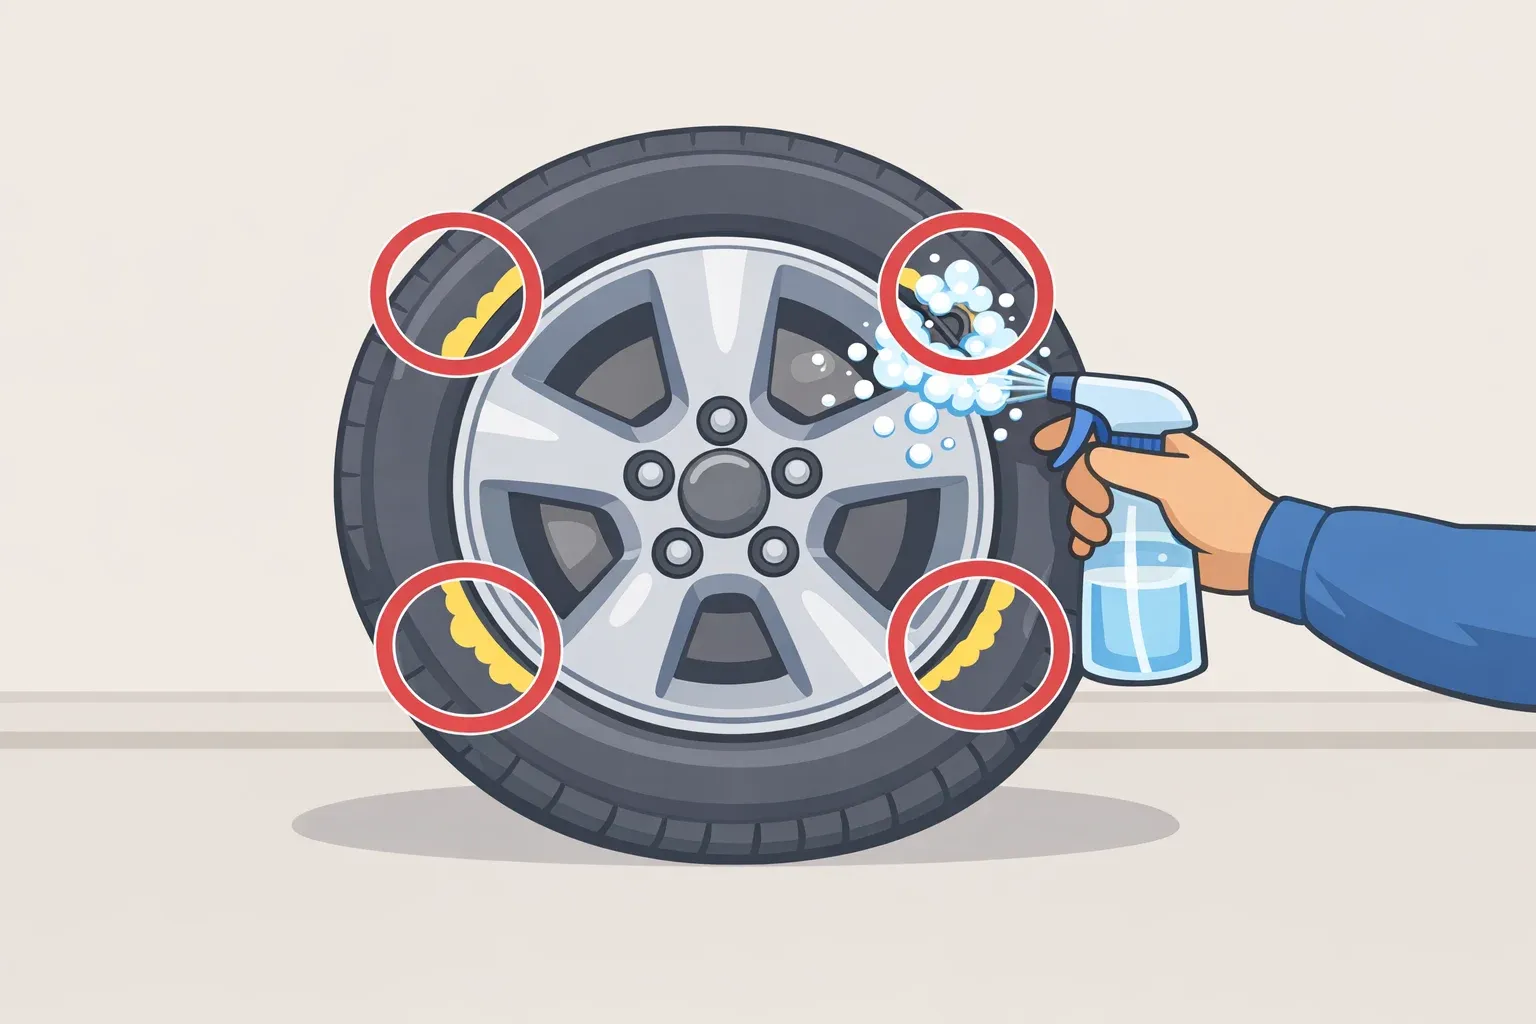
A tire that loses pressure slowly is easy to live with until it isn't. You top it off, drive for a week, top it off again. The dashboard light comes on at an inconvenient moment. The frustrating part is never the leak itself; it's not knowing where to look. Start spraying randomly, and you'll waste time. Start at the right four places, in the right order, and most slow leaks reveal themselves without removing the wheel.
This guide walks through the four locations where slow leaks most commonly originate, how to use leak detection spray or soapy water to find the source, and when what you find should go to a shop rather than a repair kit.
Where slow leaks hide and why they're easy to miss
According to CHAOS Moto, most slow tire leaks don't start in the tread. They show up at four specific points: the valve core, the bead seat, the valve stem base, and the TPMS sensor seal. The valve core rarely shows a visible weep. The bead seat is especially vulnerable on corroded, curb-rashed, or aftermarket wheels. The valve stem base dries out and cracks with age where rubber meets the rim. The TPMS sensor seal is easily disturbed during mounting and easy to overlook afterward. None of these are in the tread, which is precisely why random spraying misses them.
Soapy water is the default fallback, and it handles fast, obvious leaks well enough. The problem is that soap solutions tend to flow downward under gravity before they have time to form a bubble, according to INFICON's testing. That incomplete coverage means missed leaks, and the failure is physical rather than a matter of soap brand. INFICON tested a higher-viscosity formula specifically engineered for better surface adhesion and still struggled to detect the smallest leaks.
A purpose-built tire leak spray clings to vertical and curved surfaces long enough to foam at the air source. CHAOS Moto makes one called Bubble Check, where air escapes, it foams into tight, visible bubbles rather than dripping off before anything registers. Dish soap will work if the leak is a nail in the tread with air escaping at a visible rate. As the leak gets slower and the surface more curved, the gap between soap and a purpose-built spray widens. Use what you have; just know its limits.
Before you start: what detection can and cannot tell you
Detection spray is a diagnostic tool. Finding the source is step one in a decision process, not the end of it.
A proper tire repair requires a trained technician to demount the tire from the rim so the interior can be inspected. The Tire Industry Association notes that a nail in the tread can produce severe sidewall damage invisible from outside. String plugs and on-the-wheel repairs are classified as temporary measures only. A correct fix requires demounting, removing the damaged material, and sealing the innerliner with a proper repair unit not just plugging the hole from outside, and not a patch alone.
The repair limits are specific. Shoulder and sidewall damage cannot be repaired at all. Any tread puncture larger than ¼ inch requires tire replacement, not patching. The TIA is direct on the stakes: when tires are repaired improperly, the results can be deadly.
Use this decision framework once you find the leak:
Valve core tip: Worn or loose core; DIY repair with a valve core tool.
Valve stem base: Cracked or aged rubber stem; DIY replacement may be possible, but a shop can handle it.
Bead seat: Corrosion, rim damage, or poor seal; shop repair needed because the bead must be broken and reseated.
TPMS seal area: Disturbed sensor seal; shop repair needed because sensor removal is required.
Tread puncture: Nail, screw, or road debris; shop repair recommended because the tire needs an internal inspection.
Sidewall or shoulder: Structural damage; replace the tire because this area is not repairable.
How to find a slow tire leak with soapy water or detection spray: step by step
What you need:
Tire inflated to its correct pressure (check the placard on the driver's door jamb, not the tire sidewall)
Leak detection spray, or dish soap mixed with water as a lower-precision fallback
Marker or chalk to flag the location
Step 1: Inflate the tire to spec. The spray needs enough pressure to push air through the leak and produce visible bubbles. A significantly underinflated tire may not generate enough airflow at a slow leak to register. Fill to the door placard spec before you start.
Step 2: Spray the valve core. Hold the nozzle directly at the valve stem tip and apply spray around and into the valve opening. Watch for small, steady bubbles forming right at the tip. That's a weeping valve core. If the leak is here, you're done diagnosing. A valve core tool and a replacement core are inexpensive, and the fix doesn't require removing the wheel.
Step 3: Spray the valve stem base. Move down to where the rubber stem meets the wheel rim and apply spray around the full perimeter of that junction. Older stems dry out and crack at this join. Bubbles here confirm an active leak at the stem base.
Step 4: Work around the bead seat on both sides. Spray along the full circumference of the tire on both the inboard and outboard sides where the tire edge contacts the rim. Go slowly. This is the longest check and the most common place to miss something. Bubbles along the bead indicate an imperfect seal, which can result from rim corrosion, curb damage, or a mounting issue. This is a shop repair: the tire needs to be broken from the bead, the rim surface cleaned or treated, and the tire reseated.
Step 5: Check the TPMS sensor zone. If the vehicle has a tire pressure monitoring system, the sensor sits inside the wheel near the valve stem. It isn't accessible from outside. Apply spray around the valve stem base and the surrounding rim area. A disturbed sensor seal typically shows as bubbles in that zone. If nothing appears externally and the tire was recently mounted or rotated, a disturbed TPMS seal is still a plausible cause. Flag it for a technician.
Step 6: Check the tread and sidewall if steps 2 through 5 show nothing. Spray along any visible damage in the tread nails, screws, and embedded debris, and watch for bubbling. Apply spray to both sidewalls as well. A sidewall bubble confirms a leak, and it also means the tire is not repairable. Take it to a shop for a replacement, not a plug.
Step 7: Mark the leak, then re-spray after repair. When bubbles appear, mark the location before wiping the spray away. After the repair is made, apply spray to the same location again before the wheel goes back on the vehicle. This confirmation step is the one most commonly skipped and the one that prevents the same tire from coming back with the same complaint.
If you find no bubbles anywhere: Don't assume the tire is fine. Recheck the pressure after driving and again after the vehicle sits overnight. Some leaks don't produce bubbles consistently during a static check, a valve core that weeps only under temperature change, for example. If pressure keeps dropping and spray finds nothing, external methods have reached their limit. Take the wheel to a shop for inspection from the inside.
Common mistake: Applying too much spray at once and creating a general foam bloom across the wheel surface. The value of the spray method is localization. Apply it to one targeted zone, wait, watch, then move to the next. A foam bloom covering six inches of bead tells you nothing useful about where the leak actually is.
What to do once you've found it
If the bubble is at the valve core, handle it yourself. If it's at the bead seat, the sidewall, or anywhere requiring internal inspection, the detection work is done. Take it to a technician. The Tire Industry Association is clear that some damage cannot be repaired and some repairs should not be attempted without pulling the wheel. No detection method changes that.
If the spray finds nothing and the pressure keeps dropping, wheel-off inspection is the next step. That's the method telling you what it can't see. The spray doesn't fix the tire. It just stops the guessing.








Comments
Be the first, drop a comment!